Saturday, May 7, 2011

Buggin' Out

It's that time of year.  When the heat and sunshine cast out those cold and rainy days making the conditions ripe for the emergence of those dormant and overwintering garden insects.

The other day when I was puttering around in my garden I uncovered a whole array of different insects taking up residence.  I have been studying insects and their management over the last 5 months so this was geek-out central for me and needless to say, a very exciting discovery.  However, for many gardeners, the sign of pests in their garden is anything short of exciting.

My specimens included spittlebug, aphids, whitefly, silverfish, leafminer, spider mites, a beet armyworm (one of the many destructive caterpillars found in gardens) and all kinds of incubating eggs.  This was the optimal time to do some de-bugging before the numbers of these guys increased, which in some cases can be as fast as 48 hours. 

Whitefly

The world of insects and the control of them is a vast subject that people devote their entire life to studying.  So in the interest of keeping this brief and not boring you to tears, here are a few tips on how to keep those buggers in check.

Leafminer on Chard
MONITOR
Now is the time to become proactive in your gardens.  Early detection is key in controlling pests.  Once the population becomes large, it may be too late to control it, so check your plants regularly, 2-3 times a week if possible.  Get up close and inspect all parts of your plants and its inhabitants - the stems, the leaves - especially the undersides - the soil, and underneath any pots, mulch or other crevices that earwigs, snails, slugs, or sowbugs can hide under.


REMOVAL
If in your monitoring you notice any pests, removing them is essential.  Handpick and destroy insects like caterpillars, slugs, or snails.  Wipe off any eggs found on the undersides of leaves.  Spray aphids off with a strong jet of water. 

PREVENTION
Keep your soil healthy by regularly tilling and amending.  Select healthy, organic  plants and untreated, certified organic seeds and plant them correctly.  Use sticky traps to capture male insects and prevent mating.  Use crop rotation to break the cycle of pests and disease.  Encourage natural enemies and beneficial insects by increasing the diversity of crops in your garden, i.e., companion planting and intercropping.  Water appropriately according to the needs of your plants.  Remove and destroy severely diseased plants.

Green lacewing - a beautiful beneficial

PESTICIDES
While I highly recommend all the above methods FIRST, there are some instances where pesticide use is necessary.  Pesticides can be organic or inorganic.   Insecticides, herbicides, fungicides and chemical substances are all agents that fall under the pesticide definition.  If you use a pesticide, read and use it according to the label and be informed of the potential human and environmental affects.  Although not devoid of it's potential hazards, I typically use OMRI www.omri.org approved products.  They are considered certified "organic" (we could have a whole discussion about that alone) and are relatively non-toxic and safe for the environment.  Some commonly used  organic pesticides are horticultural oils, neem oil, insecticidal soaps, and BT (Bacillus thuringiensis).  Refrain from the use of toxic pesticides as they cause long term harm for a short term result.


It is unlikely that you will ever get rid of all your garden pests nor would you want to since part of keeping a balanced ecosystem is maintaining the presence of beneficial insects which means providing them with a food source - your garden pests.  We live in a world where our food can be purchased perfectly unblemished from the grocery store.  But when you grow your own edibles, some damage  is inevitable.  The holes in your kale, the nibbles on your lettuce, bruises on your apples, or disfiguration of your tomatoes is ok and actually quite special because in the natural order of mother nature, everything is imperfectly balanced.

Sunday, February 27, 2011

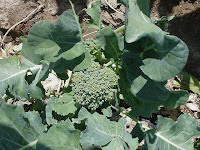
Broccoli: A Protein Powerhouse That Really Packs A Punch

I'll be honest, broccoli has never been my favorite vegetable.  As a kid, it always seemed to show up on our dinner plates with a mushy, flavorless texture.  And as many parents do, I was always told to eat my vegetables.  My uncle used to tell me it would make my hair turn curly.  Guess I ate just enough to grow the wavy hair I have now.

I have since come around and in my adult years have developed an appreciation for the vegetable.  Variety, freshness and preparation are key to how my taste buds will react to this beastly green giant.  Plus, it's a nutritional powerhouse.  It's a very good source of dietary fiber and chock full of vitamins and minerals: Vitamins A, C, K, E (Alpha Tocopherol), B6, Folate, Thiamin, Riboflavin, Niacin, Pantothenic Acid, Calcium, Iron, Magnesium, Phosphorus Potassium, and Zinc.  AND it contains anti-oxidants such as sulforaphane that help prevent cancer.

But this power veggie doesn't stop there.  Broccoli is an excellent source of protein.  It's protein content is 34% of its dry matter and according to the USDA, one cup of chopped broccoli can provide over 4 grams of protein.  It contains more fiber than a slice of whole wheat bread, more calcium than a glass of milk, and 75% of Vitamin C than that of oranges!  However, eating broccoli alone will not give you a complete protein because all the essential and non-essential amino acids are not all present in one single plant.  So to get your protein punch, pair it with foods that have a complimentary amino acid makeup such as corn based foods like cornmeal or game meat such as buffalo.

Growing broccoli is fairly easy.  It can be grown year round but as a cool weather crop, it is at it's best in the Fall and Winter.  Provide ample water and plenty of nitrogen, calcium, and potassium.  Pests such as aphids, cabbage loopers, cabbage worms, cutworms, earwigs, snails and powdery mildew can become a nuisance so be on the lookout to detect them early.  
  
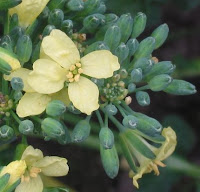
Harvesting broccoli at the right time, or any crop for that matter, is critical if you want to get the most nutritional bang for your buck.  Look for heads with firm stalks and tight, green florets and harvest broccoli when the heads are small and before the yellow flower buds open.  Leave the small green leaves on the stem intact - they provide good nutrients.  Broccoli loves to chill out, so it's best to pick it in the early morning when temperatures are cool.  Then immediately place them in some ice water and then in your refrigerator.  Your broccoli can last for up 10 days in a perforated plastic bag in the crisper drawer of your refrigerator. 

When preparing broccoli, the possibilities can be endless.  Saute them with a bit of garlic, ginger, and chili flakes.  Try them in a stir fry, casserole, in a soup or frittata, roasted, steamed, or simply raw in a salad or with a dip.  This is a recipe I adapted from Nourishing Connections: The Healing Power of Food and Community, by Cathryn Couch and JoEllen DeNicola.  I brought this dish with me to a potluck with my cycling teammates and it was a hit:

Broccoli & Millet Salad with Toasted Cashews
1 cup millet
1/4 tsp sea salt
2 cups boiling water
2 cups broccoli, florets and chopped stems
1 tsp minced garlic
3/4 cup thinly slice celery
1/4 cup minced fresh dill weed
1/4 cup minced fresh parsley
1/2 - 1 cup cashews
1/3 cup lemon juice
1/3 cup olive oil
1/2 tsp sea salt

1. Toast the millet in a saucepan over medium heat, stirring constantly until it begins to brown.  Carefully add the boiling water and the sea salt, reduce the heat to low and cover.  Cook until the water is absorbed and the millet is tender, 20-25 minutes.
2. Put the millet on a cookie sheet and spread it out to cool.
3. While the millet is cooling, steam the broccoli just until tender and bright green.  Rinse under cold water, drain well and place in a large bowl.
4. Add the celery, dill and parsley to the broccoli.
5. In a separate bowl, whisk together the lemon juice, olive oil and sea salt.
6. When the millet is cool, crumble it into the vegetables.  Add the cashews and the dressing and toss everything together.

Eat your greens!   Grow curly hair!

Sunday, February 13, 2011

Healthy Fuel for Your Body

A few weeks ago I made a big decision to cycle 100 miles around Lake Tahoe in early June.  The event is sponsored by the Leukemia and Lymphoma Society, an organization dedicated to finding a cure for blood cancers - leukemia, lymphoma, Hodgkin's disease and myeloma.  It's a pretty big commitment - waking up at the crack of dawn every Saturday to ride with my teammates, fundraising, gym workouts and rides during the week.   

Our first ride was last Saturday which was followed by a clinic on nutrition.  Having never participated in this kind of athletic event before, I was eager to learn some great healthy tips on how to fuel my body when riding long distances.  To my surprise, the products they were recommending were full of high fructose corn syrup, artificial flavorings, evaporated cane juice, soy lecithin, and the list goes on.   In a room of about 50 people, I was one of two that asked about alternatives to foods with refined sugars.  Nuts and dried fruit were about the extent of my answer.  I asked whether something like a LaraBar would be a good alternative and no one knew what I was talking about. 


LaraBars are nutritional bars made from whole, simple foods, containing no more than 2-9 ingredients.  They are gluten, dairy, and soy free, non-GMO, vegan, and delicious!  Take a look at a Power Bar and you will find a long list of ingredients with words you can hardly pronounce.  My theory, if you can't pronounce it, don't eat it.

Since my nutritional clinic, I have learned that there seems to be a detachment from how athletes train to what they put into their bodies.  Doesn't quite make sense to me since the two seem to go hand in hand, but perhaps it's just a different mindset.  So during my training over the next few months, I'll be fueling my body with healthy snacks like LaraBars, kale and flaxseed chips, dried fruits (apricots, apples, bananas), nuts, energy balls (*see recipe below), and coconut water, to name a few.  

Energy Balls
This recipe was made up by my kitchen creative sister.  You can play with the measurements - they are not exact.

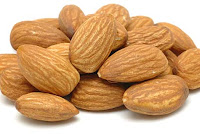
Almonds - about 1/4 cup
Cashews - about 1/4 cup
Flax seeds - 1-2 tblsp
Shredded coconut - about 1/4 cup
Dates and/or Honey - 2 tblsp
Almond butter - about 1/2 cup
Cacao powder - 1 tblsp
Maca powder- 1 tblsp
Vitamineral Green* (for an extra boost) - 1 tblsp

Chop the nuts, flax seeds, and coconut in a Cuisinart to a crunchy consistency - not fine.  Add the almond butter and dates pulsing a few times Add the cacao, maca and vitamineral green powders and pulse a few more times until the consistency is binding to form into balls.
*Vitamineral Green is a superfood powder that can be found at health food stores

Remember, you are what you eat!

*If you would like to donate to a great cause and help me reach my fundraising goal, please visit my website: http://pages.teamintraining.org/rw/ambbr11/cbarreti2p

Sunday, January 23, 2011

Cleaning Out

This week I started on a cleanse.  After spending last week weaning off certain foods, today is officially Day 1.  Although several of my friends have done different kinds of cleanses throughout their life, this is a first for me. 

I chose to do this not because I'm unhealthy, but because my body felt like it needed it and I was curious to see how it would affect my overall health.  

Our bodies are essentially toxic.  The foods we eat containing sugar, high fructose corn syrup, trans fats, food additives, preservatives, along with the amount of stress we take on coupled with environmental elements (chemicals, mold, solvents, even medications we take) are all contributing to a body that is out of balance.  In order to eliminate these toxins and restore balance, we need to detoxify the body.  This means cutting out the processed foods, hydrogenated (trans) fats, sugars, caffeine, alcohol and replacing them with good proteins (chicken, fish, nuts, soy), good carbohydrates (vegetables, fruits, whole grains, beans) and good fats (nuts, extra virgin olive oil, avocados).  

This is no cleanse where you fast for 21 days.  You eat, but its WHAT you eat that helps your body flush out the toxins.  So far there is a noticeable difference in my overall level of energy, concentration, focus, and sleeping patterns (remember, this is including the past week of eliminating alcohol, caffeine, sugar, dairy, bread, etc.).
 
This particular cleanse I'm doing is a lot to take on and you've really got to commit yourself in order to get the maximum results.  So for those who are not ready to do something like this, here's my recommendation.  Try cutting out, or at the very least, cutting back on one thing from the list of "bad" foods like sugars, and replacing it with one (or several) of the "good" foods, like more leafy greens.  Try this for one week or perhaps two, and see what happens.  Maybe you'll be inspired to eliminate something else.

Now go eat an apple (organic of course!)

Sunday, January 9, 2011

For the Love of Air

I recently fell in love with these cool little plants called Tillandsias, or Airplants.


These funky little guys come in all shapes, sizes and colors (over 550 known species).  Belonging to the BROMELIAD family, Tillandsias are found primarily in Central and South America where they grow on rocks, cliffs, trees and shrubs.


They need no soil because they gather their moisture and nutrients from the rain and air through their leaves.  How cool is that?

Although they are relatively hardy and easy to take care of, Tillandsias do require 3 basic things:

 Light, Water and Air Circulation

Light
The amount of light will depend on the species, but generally speaking, they like bright and filtered light.  The thick-leafed, grey to white species require more light and can tolerate full sun.  The softer leafed species need less light.  You can experiment by moving the plant around to see what it prefers.


Water
Although they can withstand long periods without water, Tillandsias do like water.  Soak them every one to two weeks in a bowl or bucket of water for anywhere from 5 - 20 minutes.  The frequency, again, can depend on the species so play around with it to see what your plant likes.  If you notice the leaf edges beginning to curl up, this could be a sign that they plant is drying up.  Give it a good soaking.  Spray misting is not recommended for indoor plants since it is usually not a sufficient amount of water for them.  Make sure they dry thoroughly within 4 hours or else they are susceptible to root rot.  They like humidity so a bathroom with good filtered light and good air circulation could be a perfect spot for them.  

Air Circulation
Fresh air will do them good.  Open a window or set them outside once in awhile.  Outdoor plants can withstand a wide range of temperatures from 100 F to freezing.
 

 They make great gifts and many of my family and friends received some of my creations over the holidays.


Wednesday, December 29, 2010

C is for Cold; S is for Soup

Brrrh!  Temperatures here in the Bay Area have dropped into the low 40's, which I know for some of you East-coasters is nothing, but for us moderate temperature folk, it's COLD.  And when it's cold, all I can think of is hot soup!

Last week I had a little holiday soiree at my house and I came up with this butternut squash soup recipe to accompany our delicious Pomegranate Key-Lime cocktails!  This recipe will feed a generous portion to about 8 people.


Smashing Soiree Butternut Squash Soup

Ingredients
  • 2  tablespoons butter
  • 1  cup onion
  • 1  large clove garlic
  • 1  cup  Braeburn apple
  • 5  cups cubed peeled butternut squash (about 1 1/2 pounds)
  • 2  cups cubed peeled sweet potato (about 1 large)
  • 1/2  tsp dried rubbed sage
  • ¼ tsp nutmeg
  • ¼ tsp cinnamon
  • 1  teaspoon  kosher salt
  • 1/2  teaspoon freshly ground black pepper
  • 4  cups  fat-free, less-sodium chicken broth
  • 1/2  cup  half-and-half
  • 1/4  cup  crème fraîche, for garnish   
  • 12  ounces  baguette, cut into 16 slices
  • 3/4  cup  (3 ounces) shredded Gruyère cheese
Preparation 
  1. Melt butter in large saucepan over medium heat. Add onion; sauté 3 minutes. Add garlic and apple; cook, stirring constantly, 1 minute. Add squash and next 6 ingredients; sauté 3 minutes or until well-combined. Add broth, and bring to a boil. Reduce heat and simmer 20 minutes or until squash and potato are tender.
  2. Place half of squash mixture in blender. Remove center of blender lid (to let steam escape); secure lid. Place clean towel over opening to avoid splatters.  Blend until smooth. Pour into a large bowl. Repeat with remaining squash mixture. Stir in half-and-half. Cover and keep warm.
  3. Spoon soup into small bowls and swirl in 3/4 teaspoon crème fraîche. Serve immediately with a warm baguette topped with Gruyère cheese.
Enjoy and may you all stay warm and toasty!

Friday, December 10, 2010

Being Human

If we learn not humility, we learn nothing.
- John Jewel
I've been in the gardening profession for over 8 years and for the most part, I've been very fortunate to have great success with my clients.  I run my business with the mindset of building lasting and trusting relationships with my clients and their gardens.  I am thorough and put a lot of thought and attention into my intentions for the gardens.

This past week, I took on a new client.  I was selected out of a few other landscapers to redesign and landscape a portion of a backyard that had become overgrown.  Large hydrangeas and fuschias were to be dug out and transplanted to another area of the garden and the new plants I had selected were to go in.  Pretty straightforward.

First bed before removal
But, I screwed up.  I removed a very well established, beautiful and rare fuschia tree that should not have been removed.  The tree stood out in the garden and was actually an important focal point.  Ironically, as I was hacking away at it, I thought to myself what a shame it was for the clients to want to get rid of such a magnificient tree.
New plants

As landscapers, there is a lot that goes on behind the scenes in seeing a job from start to finish.  And as much as you can plan and prepare, it almost never goes off the way you expect and almost always takes more time than you estimated.  Furthermore, when you are working with a new client, someone who's not familiar with your work, their is an added pressure and uncertainty wrapped up in the hope that their vision matches up with your vision.  You can explain, communicate, show and draw pictures all to the best of your ability, but in the end, you are riding on faith that your clients will be happy and pleased with your work.

Second bed
My clients were certainly surprised, and suffice it to say, a tad unhappy that their beautiful tree had been removed.  I don't know if this is necessarily the worst thing that can happen on a job, but it's pretty bad.  You can fix an irrigation system or rebuild a wall, but you can't replace a well established tree that had been growing for many many years.  After a lot of back and forth explanations and my profuse apologies, we were able to put the misunderstanding aside and come to an agreement on what to do next.

After with the new plantings
Being human means we make mistakes, sometimes big ones, but it's what we do with it that determines the real outcome.  This scenario could have gone in a million different directions, but thankfully, my clients were pretty understanding and able to put it behind them and still wanted me to return to their garden.  As for me, well...lessons in humility are always good for the ego. 

 - Gandhi